How To: Run Your First Vulnerability Scan with Nessus

Get your Nessus vulnerability assessment tool up and running with these five easy steps.
With Nessus, you can gain full visibility into your network by conducting a vulnerability assessment. Read on as we guide you through the five steps to run your first Nessus scan. (If you have not yet installed Nessus, please click here to see the installation guide.)
Step 1: Creating a Scan
Once you have installed and launched Nessus, you’re ready to start scanning. First, you have to create a scan. To create your scan:
- In the top navigation bar, click Scans.
- In the upper-right corner of the My Scans page, click the New Scan button.
Step 2: Choose a Scan Template
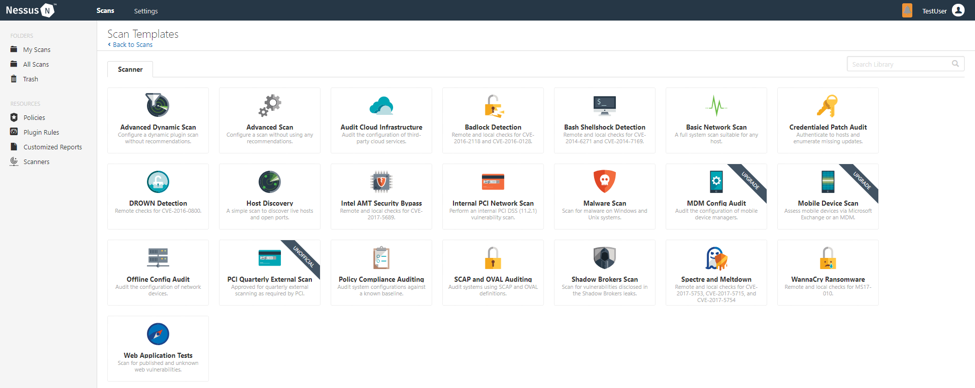
Next, click the scan template you want to use. Scan templates simplify the process by determining which settings are configurable and how they can be set. For a detailed explanation of all the options available, refer to Scan and Policy Settings in the Nessus User Guide.
A scan policy is a set of predefined configuration options related to performing a scan. After you create a policy, you can select it as a template in the User Defined tab when you create a scan. For more information, see Create a Policy in the Nessus User Guide.
The Nessus interface provides brief explanations of each template in the product. Some templates are only available when you purchase a fully licensed copy of Nessus Professional.
To see a full list of the types of templates available in Nessus, see Scan and Policy Templates. To quickly get started with Nessus, use the Basic Network Scan template.
Step 3: Configure Scan Settings
Prepare your scan by configuring the settings available for your chosen template. The Basic Network Scan template has several default settings preconfigured, which allows you to quickly perform your first scan and view results without a lot of effort.
Follow these steps to run a basic scan:
1. Configure the settings in the Basic Settings section.
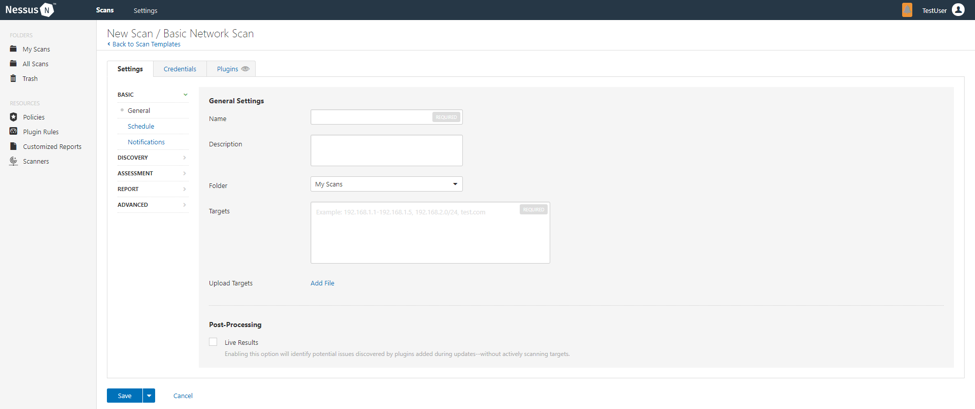
The following are Basic settings:
| Setting | Description |
|---|---|
| Name | Specifies the name of the scan or policy. This value is displayed on the Nessus interface. |
| Description | (Optional) Specifies a description of the scan or policy. |
| Folder | Specifies the folder where the scan appears after being saved. |
| Targets | Specifies one or more targets to be scanned. If you select a target group or upload a targets file, you are not required to specify additional targets. |
2. Configure remaining settings
Although you can leave the remaining settings at their pre-configured default, Tenable recommends reviewing the Discovery, Assessment, Report and Advanced settings to ensure they are appropriate for your environment.
For more information, see the Scan Settings documentation in the Nessus User Guide.
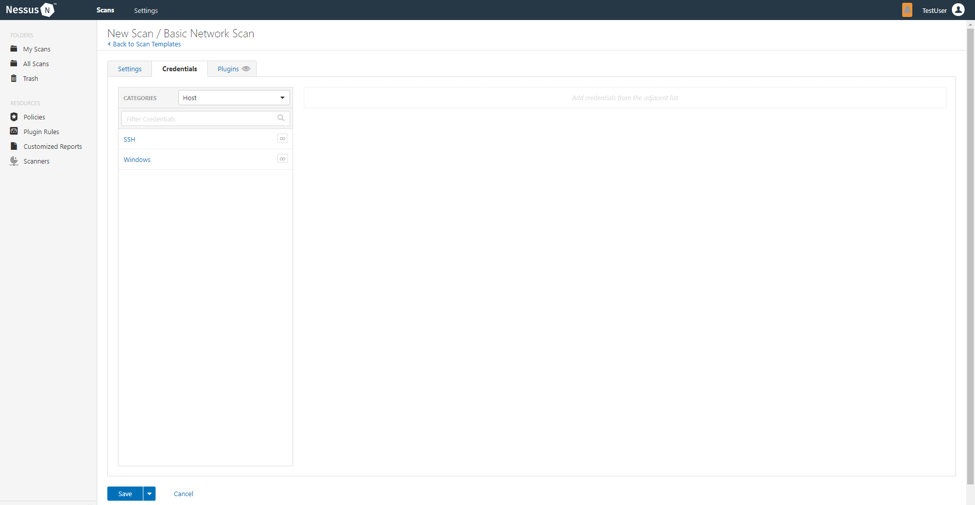
3. Configure Credentials
Optionally, you can configure Credentials for a scan. This allows credentialed scans to run, which can provide much more complete results and a more thorough evaluation of the vulnerabilities in your environment.
4. Launch Scan
After you have configured all your settings, you can either click the Save button to launch the scan later, or launch the scan immediately.
If you want to launch the scan immediately, click the button, and then click Launch. Launching the scan will also save it.
The time it takes to complete a scan involves many factors, such as network speed and congestion, so the scan may take some time to run.
Step 4: Viewing Your Results
Viewing scan results can help you understand your organization’s security posture and vulnerabilities. Color-coded indicators and customizable viewing options allow you to tailor how you view your scan’s data.
You can view scan results in one of several views:
| Page | Description |
|---|---|
| Hosts | Displays all scanned targets. |
| Vulnerabilities | List of identified vulnerabilities, sorted by severity. |
| Remediations | If the scan's results include remediation information, this list displays all remediation details, sorted by the number of vulnerabilities. |
| Notes | Displays additional information about the scan and the scan’s results. |
| History | Displays a list of scans: Start Time, End Time, and the Scan Statuses. |
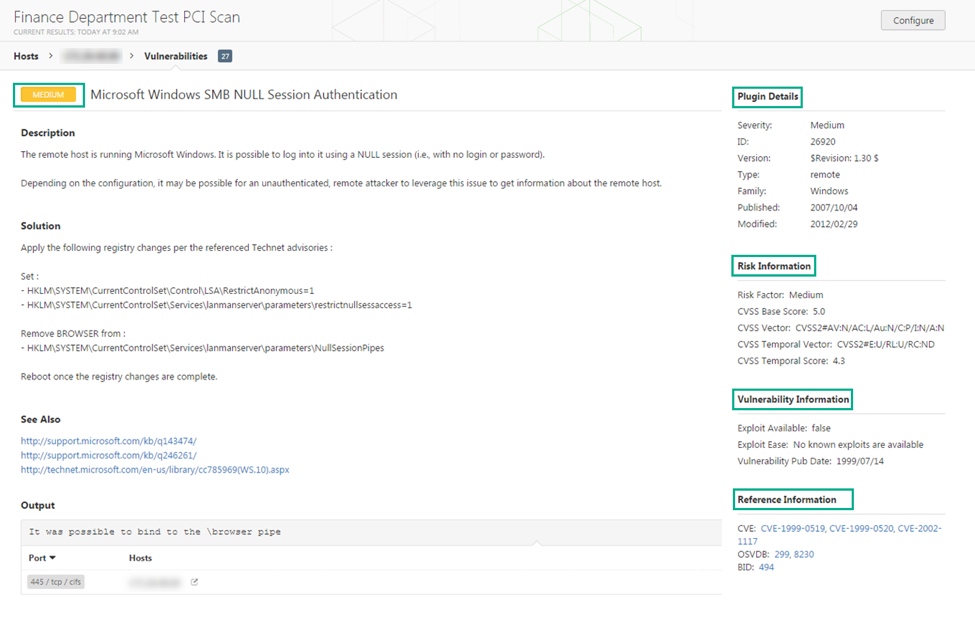
Viewing scan results by vulnerabilities gives you a view into potential risks on your assets.
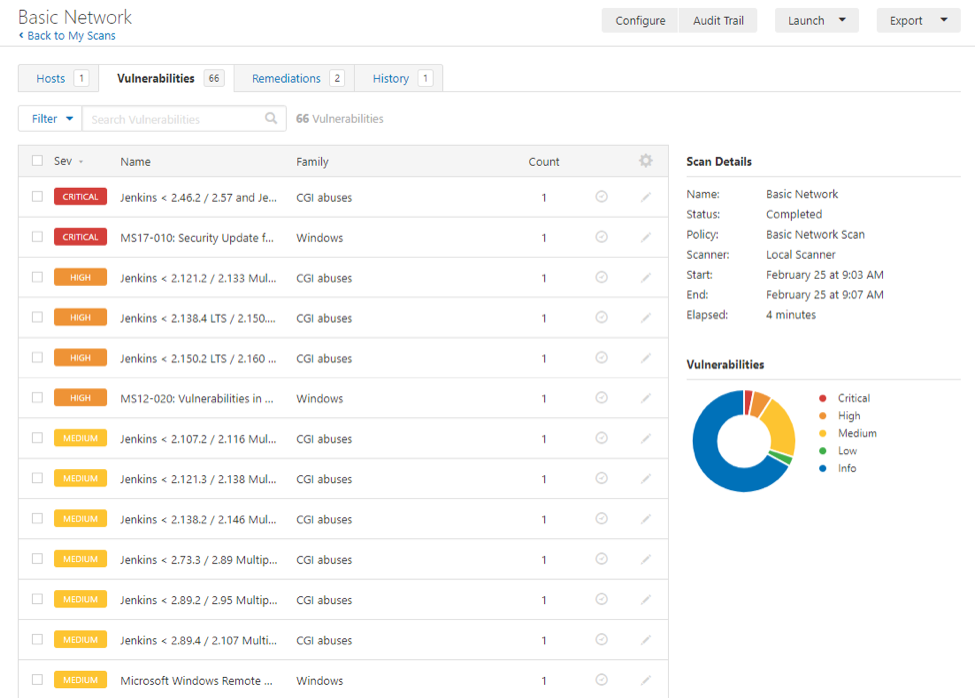
To view vulnerabilities:
- In the top navigation bar, click Scans.
- Click the scan for which you want to view results.
- Do one of the following:
- Click a specific host to view vulnerabilities found on that host.
- Click the Vulnerabilities tab to view all vulnerabilities.
- (Optional) To sort the vulnerabilities, click an attribute in the table header row to sort by that attribute.
- Clicking on the vulnerability row will open the vulnerability details page, displaying plugin information and output for each instance on a host.
Step 5: Reporting Your Results
Chances are your job isn’t done yet. You need to report your findings to your team.
Scan results can be exported in several file formats. Some of these report formats are customizable, while others are designed to be imported into another application or product, such as Microsoft Excel or Tenable.sc. For an explanation of the various report formats and the purpose of each, see the Nessus User Guide.
To Export a Scan Report:
- Start from a scan's results page
- In the upper-right corner, click Export.
- From the drop-down box, select the format in which you want to export the scan results.
- Click Export to download the report.
Thanks for using Nessus! Once your first scan is complete, you can begin to discover more of what Nessus has to offer. If you have additional questions, please see the Nessus FAQs or join in the conversation on the Tenable Community.


Tenable One
Request a demo
The world’s leading AI-powered exposure management platform.
Thank You
Thank you for your interest in Tenable One.
A representative will be in touch soon.
Form ID: 7469
Form Name: one-eval
Form Class: c-form form-panel__global-form c-form--mkto js-mkto-no-css js-form-hanging-label c-form--hide-comments
Form Wrapper ID: one-eval-form-wrapper
Confirmation Class: one-eval-confirmform-modal
Simulate Success